GLImports Custom Import Tool
The GLImports tool is an exciting new addition to GeoLab that allows users to define custom protocols by which to import their own external files into GeoLab’s formatted record types. This allows for quick and easy integration of GeoLab with the output of nearly any software program.
For a detailed breakdown of the GLImports tool and its usage, download the GLImports Manual.pdf.
Accessing GLImports
The GLImports custom import tool can be accessed in one of three ways:
Through the “GLImports…” dialog of the New Project Wizard
Through the “GLImports” option in the Assistant tab’s File menu (File/Import…/GLImports)
By pressing the F6 function key while on the Assistant tab
There are three custom import tools included in GeoLab’s GeoLab2020/GLImports folder, namely:
Delimited Import Samples: A custom import tool designed to import all of the available GeoLab record types provided through the GLImports tool, in a delimited format.
The file GeoLab2020/Sample Files/Delimited GLImports Sample.txt can be imported with this tool.
Fixed Import Samples: A custom import tool designed to import all of the available GeoLab record types provided through the GLImports tool, in a fixed-width format.
The file GeoLab2020/Sample Files/Fixed GLImports Sample.txt can be imported with this tool.
Trimble Business Center ASCII: A custom import tool designed to copy the function of the Trimble Business Center import plugin.
The file GeoLab2020/Sample Files/Trimble Business Center GLImports Sample.asc can be imported with this tool.
The above import tools and files are provided as samples for the creation of custom import tools and usage of the GLImports tool to import external data.
Overview
Usage
The GLImports tool has a simple and rigorous design which allows a user to create individual import tools and re-use methods between tools to copy and create import methods for similar datatypes.
The process for creating and using an import tool using the GLImports tool is outlined below:
Use a new or existing folder using the interface, where each folder represents an import tool.
Add “Import Rules” to the import tool. Each import rule is a small “.glm” file which tells GLImports how to go about importing a particular datatype.
Edit each .glm file using the interface, to specify the data format each import rule will handle within a given import tool.
Once all desired import rules have been added, use the import tool to import one or multiple files of the expected datatype. These will be added automatically to GeoLab’s Assistant tab and the active project, or to a list of files if accessing the import tool from the “New Project Wizard” on the Setup tab.
Import Tool
Folder of .glm files created at a desired location, which handles the import of external data according to the formats specified by each .glm file.
.glm files are executed in alphabetical order within each import tool.
Import Rules
.glm extension plaintext file created using the GLImports interface. Each file specifies a data block within another external text file (which is the file to be imported). Import rules handle a block of data with a designated starting and ending line (from the top of the page down), containing user-specified text.
Warning: do not set the starting or ending lines of two separate .glm files within an import tool to the same value.
Import tools read data within each block based on specified field locations (by column and width), or by delimiter. The tool reads line-by-line, and can interpret data in a variety of formats based on the datatype.
For a more comprehensive look at how the tool handles different datatypes, samples of each datatype have been provided in a delimited and a fixed-width format in the GLImports folder.
Each field on a line is provided with a relevant name to the specified datatype, and if a field is left undesignated by the user or is left with a name that does not match the relevant fields, it is ignored.
Features

main window
From this window, a custom import tool can be created by using the available features.
Select Import Tool box: This list box shows the available import tools.
Add Existing / Create New: Add an existing import tool or create a new tool. Import tools are stored as folders filled with plaintext files representing their components.
Remove: Remove the selected import tool from the list without deleting it (delete).
Clone: Duplicate the selected import tool and rename the copy (Shift-Enter).
Up/Down buttons: Move the selected import tool up and down in the list.
Open Explorer: Open the file explorer to the GLImports directory.
Add Import Rules box: This box provides the tools to edit the individual components of an import tool, known as import rules. These are plaintext files with the extension .glm. The list box shows the available import rules in each import tool.
Add as new rule: Add the provided name in the “Provide a name:” box as a new import rule.
Rename selected: Rename the selected import rule to the provided name.
Copy selected: Copy the selected import rule (Shift-Enter).
Delete selected: Permanently delete the selected import rule (delete).
Refresh List: Refresh the list of import rules to show any changes made to an import tool outside of GeoLab (F5).
Button beside “Refresh List”: Preview an import rule in an expanded window.
Edit Selected Rule: Edit the selected import rule in the rule editor (Enter).
Use Import Tool: Open a file selection dialog to use the selected import tool to import one or more external files (Enter).
Preview Rule: Shows a preview of the selected import rule.
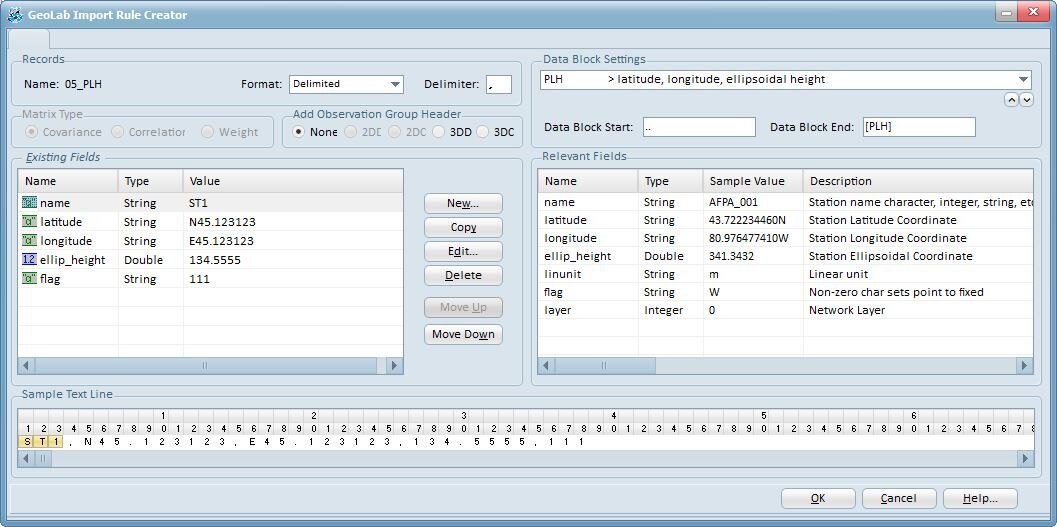
rule editor
From this window, import rules, which make up the base components of an import tool, are edited.
Records box:
Name: automatically populated name field, based on the name of the import rule.
Format: allows for the selection of one of two rule formats:
Delimited: data fields are separated by a delimiter.
Fixed: data fields are fixed-width.
Delimiter: specifies the data field delimiter, if using “Delimited” format.
Data Block Settings:
Allows a user to specify a datatype from a list of datatypes pertaining to each record type in GeoLab. Available datatypes allow a user to specify coordinates, observations, and observation groups.
The Data Block Start and Data Block End allow for the data block to be specified based on the lines preceding and following the relevant block data within a text file.
The GLImports tool will begin reading lines within a file directly after the data block start line, until the line before the data block end line. If GLImports cannot find the data block start line, the data is not read in. If GLImports cannot find the data block end line, it will continue trying to read all data in the file with a given format and may produce errors.
GLImports will skip any lines between the data block start and end that begin with a “*” character.
Matrix Type:
All relevant datatypes, containing a matrix, will prompt the “Matrix Type” box to enable and allow for an option to be selected. The appropriate matrix type will then be used to import the specified data.
Add Observation Group Header:
Relevant Fields:
Shows the list of relevant fields to a given datatype. Each datatype prompts the user to specify the location, delimiter or field-wise, within a given line, of each field.
If a given field is not provided by the user, GLImports resorts to the default value of that field. It is not necessary that every relevant field be specified by the user within a given data block, however the results of the import may be incorrect depending on the default value of each field.
Necessary fields are those such as station name, latitude, longitude, etc. Unnecessary fields are those such as linear units (default to “m”), layer (default to “0”), flag (default to non-fixed “000”), etc.
Note: GLImports will not check to ensure that imported data makes sense, so incorrectly specified .glm files may import data as default values or values that do not make sense.
Existing Fields:
Shows the list of existing fields as specified by the user. The GLImports tool reads the fields in a simple manner:
If the name of a field matches the name of a field in the “Relevant Fields” box (capital letter sensitive), GLImports will interpret this field based on its designated column and width, or position in a delimited line.
If the name of a field is not found in the “Relevant Fields” box, it will be ignored.
New: Adds a blank field to the import rule (Ctrl-n).
Copy: Copies the currently selected field (Shift-Enter).
Edit: Opens the field editor (Enter).
Delete: Permanently deletes a field (delete).
Move Up / Move Down: moves a field up and down in the fields list, and left and right in the sample line.
Sample Text Line: Displays a sample text line for the import rule.

Text field Editor
Name: Specify the name of a text field. This must match an expected “Relevant Field” to be considered by the GLImports tool. If an unexpected name is found, it is ignored.
Quick tip: random, unrelated names can be used to tell GLImports that certain fields are not needed. This is especially useful in delimited formatted datatypes, where relevant data may be several fields into a text line.
Proper capitalization is important.
Type: There are three types available to the user:
Integer: A simple integer value with no decimal point or fractional components. This can be negative or positive.
Double: A number with a decimal point and any number of decimals, specified by the “Decimals” field.
String: Any assortment of characters, including digits.
Column, Width: Used to specify the location of a field within a line, where the column number “1” is the first column. This is user-specified for fixed-width format, and automatically filled for delimited format, however these values are not of concern when using a delimited format.
Decimals: Used to specify the number of decimals for a given field. ‘
Exponent: Used to specify that a number (double) contains an exponent. Certain fields are automatically written as exponential numbers, such as matrix elements.
Sample Value: Used to specify a sample value, for the user’s benefit.
The length of the sample value is determined by the field width when in a fixed-width format, however when in a delimited format the sample value determines the field width.
Sample values are expected to follow whatever format is expected based on the Integer/Double/String types.
Copy from Recent Fields / Copy to Recent Fields: These buttons allow the user to interface with the RecentFieldProperties box (double-click).
RecentFieldProperties: This windows shows any recently created or added fields, and maintains its values as new import rules are edited.